In a comment on a
recent post,
TheBrummell said, "Any advice on getting a couple of seconds exposure through 1/2 a pair of binoculars with a Nikon coolpix 5200?" Which may sound like a crazy question. Most of us own a pair of binoculars and a camera, but I'll reckon the fraction that have used the two in conjunction is vanishingly small.
I, however, am a member of this elite group. And I realized that although I have blogged
the results of my digiscoping adventures here*, I haven't actually explained anything about the process, or given any instructions for doing it yourself. So here goes.
* A lot; possibly too much for those of you who came here hoping in vain for something paleo-related, but now that I have to feed
SV-POW! regularly I send most of my paleo ramblings there.
What Digiscoping IsAfocal projection photography, also known as
digiscoping amongst birders and as
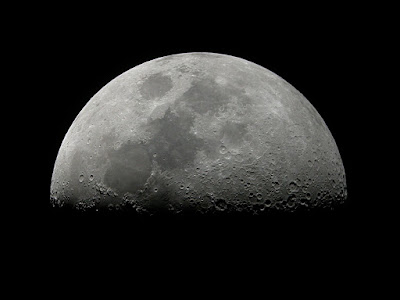
white trash astrophotography by me, is the simplest and cheapest way of taking pictures using any kind of optical device: you just hold the camera up to the eyepiece and snap away. You can do it with just about anything. TheBrummell reports taking zillions of pictures through dissecting microscopes, my anatomy students take pictures of prepared slides through the compound microscopes in the teaching lab, birders and other nature lovers use spotting scopes or, less frequently, binoculars, and amateur astronomers use telescopes. The results can be striking--do a Google image search for 'digiscoped bird' and you'll see what I mean. The picture at the top of the post is my best image from 8 months of experimentation. Click on it for the full-size version, and check out the detail.
Okay, that's the what. What about the how?
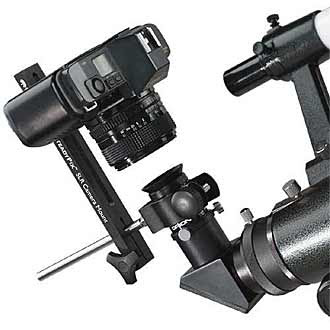
Holding the Camera SteadyI use a Nikon Coolpix 4500, and for almost all of my pictures I really have just held the camera up to the eyepiece of whatever I'm shooting through. For steadier results you could put the camera on a tripod, or buy a dedicated adapter for mounting the camera behind the eyepiece, like the
Steadypix from Orion (image from
Orion's website).
I have also started experimenting with the camera on a monopod, which is what I used for the recent
Earthshine photo. The monopod is nice because it's simple, lightweight, easily adjustable to any length, but sturdy enough to really damp out the little vibrations that you can't escape just because you're alive. (When I'm really trying to hold the camera still I can see my hands move ever so slightly in time with my pulse. Try it.) And mine was dirt cheap, something like $18.
An unexpected benefit of using a monopod is that it helps dampen out the shakes even when it's not on the ground, just by being long and heavy (relative to the camera). I discovered this when I was taking pictures in the OMNH last year and I wanted a tall-aspect photo, so I just picked up the camera plus monopod and flipped the whole rig on its side. The rig was easier to keep steady than the camera by itself, even when it wasn't propped against anything (you can sometimes prop a sideways monopod against a nearby wall, too).
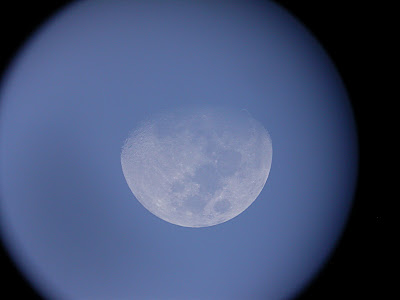
Camera SettingsFor settings I use macro mode, sometimes with a timer to eliminate the little bit of shake from manually pressing the shutter release. And I usually zoom in to eliminate vignetting, which is the "stopping down" of the image by the margins of the optical assembly (usually the field lens of the eyepiece). Here's what an unmodified vignetted image looks like:
Here's the same image rotated, cropped, and sharpened:

Vignetting is not a problem when I'm shooting at night, because the black margin does not show up against the dark sky. The settings I use to shoot the moon and planets don't usually show any stars anyway. If you want pictures of starfields, you'd be better off using a DSLR by itself--there are plenty of tutorials around that will explain how, and lots of camera-specific forums you can check out for advice and assistance.
MagnificationZooming in can also boost the magnification significantly. Magnification of any optical device is equal to the focal length of the objective divided by the focal length of the eyepiece. So a 25mm eyepiece will yield 40x in a telescope with a 1 meter focal length, but only 20x in a telescope with a 500 mm focal length. It is hard to get up to high magnifications with small refractors or Newtonian reflectors just because of that fact. Catadioptric telescopes like Schmidt-Cassegrains and Maksutovs have the opposite problem--their folded light paths mean that very small telescopes have very long focal lengths, and even fairly long-focal-length eyepieces still yield fairly high magnifications. For example, I have an Orion Apex 90 Maksutov-Cassegrain, and the tube is four inches in diameter and less than a foot long--which makes it a good travel telescope, because it fits in a carry-on bag with room to spare--but the focal length is 1250 mm, longer than my "big" telescope, a 6-inch Dob (see below).
So, two points. First, contrary to what most people think, the main point of a telescope is light collection, not magnification. A lot of astronomical objects are big but dim, like galaxies and nebulae. Some magnification is helpful, for sure, but the main benefit of the telescope is that it's light-collecting area is vast compared to that of the naked human eye. I've blogged about this
before and I won't beat it to death here.
On the other hand, a good digital camera can pull more detail out of the scene than can your eye, thanks to the zoom. I took the photo at the top of the post at a telescopic magnification of 37x and a camera magnification between 2-3x. Which means my eye saw the moon magnified 37 times, and the camera saw it magnified somewhere between 74x and 111x, and recorded that. I have a 16x20 inch print of that image ($9.99 at Costco, and 12x18s are only $2.99!), and the detail holds up even at that size, which is waaay beyond what I can see with the naked eye at 37x.
Almost all of my moon photos have been taken at low telescopic magnification. The only exceptions are closeups of just part of the moon, like the second pic down
here. I am usually forced to use low magnification for the whole-moon shots, just to get the whole moon into the field of view at once.
Exposure TimeAlthough my Coolpix autofocuses just fine, it's not so hot on figuring out exposure times for small bright objects in a sea of inky blackness. So I go over to manual for most stuff now. Here's why this matters--these photos were taken about a minute apart, but the one of the left is a two-second exposure and the one on the right is a 1/15 second exposure.
The moon varies in brightness a lot. If it's full or nearly full, I may use exposure times as short as 1/250 second or even 1/500 second. And obviously exposure time and camera steadiness are related--the shorter the exposure time, the less you have to worry about the shakes.
What To ShootDigiscopers with an astronomical bent have a limited choice of targets. Basically, the moon, the bright planets, and any evening or nighttime scenes you want to see really close up. Starfields are better imaged without a telescope, or with a long-exposure photo on a tracking mount, which is a whole 'nother kettle of (much more expensive) fish. Nebulas, clusters, and galaxies are too dim. You can image those things with simple webcams, but I'm not going to blog about that because I don't have any experience doing it. Yet. (My birthday is coming.)
Still, the moon and planets are pretty great. It is easy to forget that moon is an entire world. Yeah, airless and dead, but still: a whole world. And it's
right there. Even cheap binoculars will show you tons of details that you can't see with the naked eye.
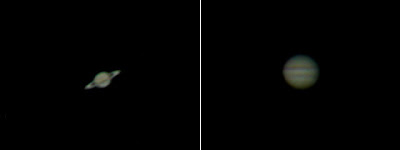
So far, the only planets I've shot are Saturn and Jupiter. The results are not going to make
APOD, but you can make out cloud belts, rings, and the Great Red Spot, which is pretty amazing considering the entire operation consisted of holding the camera up to the eyepiece and pushing the button.
 What To Shoot Through
Whatever you have. Seriously. Experimentation costs nothing, it's fun, and any result you get will probably be better than what your naked eye could have served up. So go nuts.
But if you want some advice, bigger is better. In the case of a large, bright target like the entire moon, the advantage of big optics is neither light-gathering nor magnification but resolving power. Compare these photos from similar phases but taken through scopes of different apertures:
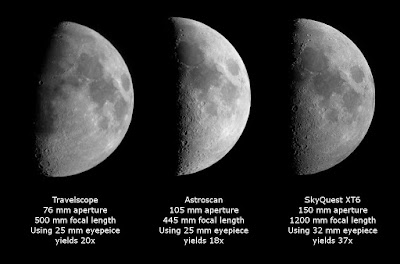
Note that the middle photo was actually taken at slightly lower magnification than the one on the left, but the resolution is far superior. Here's what those scopes look like in real life:
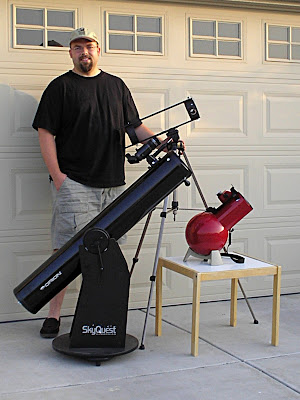
The travelscope is the skeletal thing perched on the tripod. It's currently in its third incarnation, or fourth if you count its ignoble birth as a National Geographic toy (you can read my thoughts on the utility of the original product and the ethics of its marketing
here). Previous evolutionary stages are
here and
here. The red ball-type scope on the table is my Edmund Astroscan, object of my desire since I was about 12 and my primary scope for car trips. The black howitzer-looking thing is my Orion SkyQuest XT6, a Newtonian reflector like the others, but on a Dobsonian or "Dob" mount. It's actually a lot more imposing in person--the tube is four feet long and seven inches in diameter, and the whole thing weighs 35 lbs. It just looks small next to me, which is an
occupational hazard for us sasquatchi. And it does look suspiciously like a weapon, which often gets me weird looks from the neighbors and passersby when I set it up out front. So I invite them over to have a look through it, which is a great way to make someone's day.
I have done most of my digiscoping through the XT6, at first because it was my only telescope. I went through a phase this spring of shooting through the Astroscan, because it is so small and portable. I can sling it over one shoulder, put the camera over the other, stuff a couple of eyepieces in my pockets and be outside observing in about a minute and a half. But the images served up by the Astroscan are just a little mushy compared to those from the XT6, probably because of the fast optics--f/4.4 is a steep light cone. For a while it was kind of an enjoyable challenge to see how well I could do with the Astroscan, but pretty soon I got tired of really working for so-so images when I could get better ones for less effort through the XT6.
And by "so-so", I mean only by comparison to the images I'd already been getting through the XT6. I'm actually quite proud of some of my Astroscan photos, and I don't mean to knock the little scope at all. But Aperture Rules. I'm sure if I had a 10-inch scope to play with, I'd stop digiscoping with the XT6.
Which brings up the question of why I have so many telescopes (the Apex 90 I mentioned earlier in the post is not in the above photo, nor is the Explorascope I mention below). Partly it's because I'm a telescope nut, but partly it's because different scopes serve different purposes. The XT6 is both my default scope and my big gun. If I'm home and I want to do some serious observing or digiscoping, that's what I use. The Astroscan is my grab-n-go or quick look scope, my car travel scope, and the scope I share with my little boy. The travelscope, Apex 90, and Explorascope are all contenders in my quest for the perfect airline portable scope. And anyway, according to
Ed Ting one really
needs six scopes, so I'm still under the legal limit.
But wait, you say, why am I blabbing on about telescopes when TheBrummell specifically asked about
BinocularsYes, you can take pictures through binoculars. It takes some forethought. The first problem is mounting them. Almost all binoculars have a mounting socket at the front of the center column, usually covered by a plastic cap. Lots of astronomy and camera stores sell dedicated tripod adapters, which are L-shaped rigs with a 1/4-20 bolt on the vertical side to screw into the binoculars, and a 1/4-20 socket in the base for the tripod bolt to screw into. You could also make your own out of 1/4-20 thumbscrews and scrap lumber for about two dollars. UPDATE: a five-dollar solution is shown in the
next post.
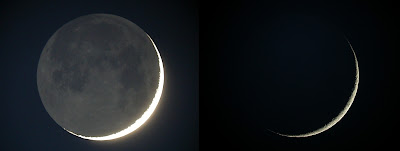
But that's not what I did. In my one adventure in binocular digiscoping, I used the Tasco 7x35s that I bought back in high school (or maybe even junior high). They have a mounting socket, but it's not a standard size, and I don't have a binocular adapter anyway. But I still got them mounted to the tripod. I used one of the struts from the travelscope, which has an inset 1/4-20 T-nut for tripod attachment, and simply lashed the binoculars to the strut with big rubber bands. It looked weird as hell:

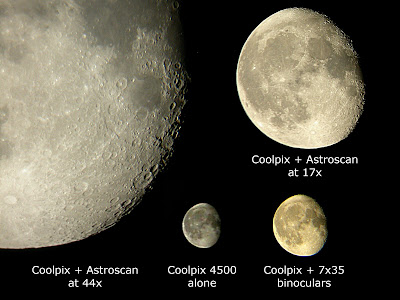
How did it work out? Not too bad, actually. I had to squat down and put my head right next to the travelscope strut to sight the things in, but the focuser worked fine and I didn't have any problems taking pictures. I went a little nuts that night taking pictures of the same moon through several devices or none at all, in anticipation of writing this very post. Here's the comparison shot:
UPDATE: Gah! Better binocular photos now available, again in the
next post.
The only real surprise in putting this together is how well the Coolpix did by itself, using maximum zoom and steadying the camera against one of the columns on the back porch.
To Shoot or Not To ShootI actually feel like kind of a weiner putting up the binocular shot here at the end, after having kicked off the post with a picture that is far better than you're ever going to get through binoculars. I'm not trying to discourage you--quite the contrary! The first time you get a nice, reasonably sharp photo of your own, it will feel pretty damn good. And it will hopefully make you want to do more.
I am always telling people that getting started in astronomy does not have to be prohibitively expensive. Even cheap binoculars will show you tons of stuff you can't see with the naked eye (especially if they're
mounted on something), and not just on the moon. All of the Messier objects are visible in binoculars in dark skies, and most serious amateur astronomers spend at least part of their time observing with binoculars.
Orion has several good beginner telescopes in the $100-250 range, a new
Astroscan will run you $199 but used ones can be had for a little more than half that if you look around, and an XT6 is $269. But right now you can buy a workable telescope for about the same price as a modest pair of binoculars: Celestron's
Explorascope, an 80 mm reflector, is on sale for under $40. Eighty mm is not much, and you won't get any XT6-worthy pictures through it, but the views will be closer to those through a six-inch scope than to those served up by binoculars (at least at higher magnifications; at low mag,
maybe not). So if you've been reading and wondering if you'd get anything out of owning a telescope, now's a good time to find out without breaking the bank. I've got one in the mail, and I'll review it here once I get a chance to test it out.
Clear skies.
Labels: Amateur Astronomy, I took this, Let Me Walk You Through It